Thursday, July 29, 2010

Hot pink bollywood beet sauce

Here's how to make a quick and tasty beet-yogurt sauce to complement the preceeding red lentil & sweet potato stew. First ask your guy to go get you some chives from the garden. Do not be surprised when he comes back holding just a few sad, teeny pieces. Just send him back for more. Mince one tablespoon each: sweet onion, chives and parsley.Get one teeny tiny beet. See? It really is wee. If you don't have a tiny beet just use part of a regulation-sized one. Peel said tiny beet and shred it into 1/2 cup of plain yogurt. Mix in the chives, parsley and sweet onion. Add salt and pepper to taste plus the juice from half a lemon.
Mix well, watch it go all hot pink, and set aside until it's time to eat. This sauce is great for many things actually--anywhere you need a tangy lift and a hot pink pop of color.

Red lentil and sweet potato stew

This is bright orange! And if you make it along with my recipe for hot pink beet sauce it will look like you're having one of Aishwarya Rai's backing dancers for dinner...and if that's not fun I don't know what is.Dice up one small onion (or half of a large one). Peel one small sweet potato and cut into small bite-sized pieces.While you are cutting things up, dice 2 pieces of thick-cut canadian bacon. Now. This is: a.) optional entirely because this is delicious without any meat in it at all; b.) even better if you use 1/4 pound of chopped real bacon instead of canadian; c.) also would be awesome with sausage. Or d.) all of the above! Wait. Scratch d.), I think it's impossible. The moral of the story is I used canadian bacon because I had a bit left over that needed using up, but this will be improved if you replace it with an equal amount of a different pork product, so keep that in mind.Also mince up 1 clove of garlic and measure out 1 cup red lentils.Heat up 1 tablespoon of the fat of your choice (I used bacon fat but butter/olive oil are perfectly fine) and saute the onions over medium heat until they are softened but not at all browned (about 4-5 minutes.)Add in your chunks of canadian bacon. Note: if you are using real bacon or sausage, don't use any extra fat in the first step, but just saute the meat together with the onions--it will render plenty of fat to work with so we don't need to add more. Canadian bacon is just kind of dry and lame so it needs an extra boost.
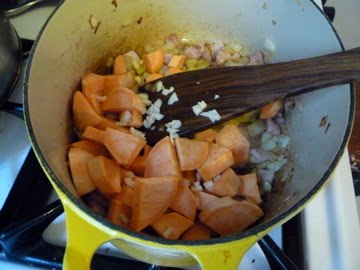
Continue to saute for another few minutes, then add in your sweet potato chunks and minced garlic. Let them cook for 3 minutes, then clear a space in the center, add a drizzle of olive oil (again, only needed if you aren't using bacon or sausage!) and add 1 teapsoon each cumin and chile powder to bloom in the hot oil. This step really brings out the flavor in the spices, rather than just dumping them in. You can also add in a pinch of red pepper flakes at this point.Now in go your lentils! Getting pretty orange in there...Tomato paste! I like the kind that comes in tubes because it stores well in the fridge for when you only need a little bit at a time. Like now. We only need 1 tablespoon for this recipe.Make a space again in the center of the pot and saute the tablespoon of tomato paste quickly, just to get rid of the tinny taste that it has (or is that just me?).It is a lovely reddish orange color, isn't it?Now add 1 1/2 cups of chicken stock (or water or veggie stock are fine as well) and 1/2 cup white wine.This should be all the liquid the lentils need to get soft. Turn heat to low and cover the pot partway to cook for about 8-10 minutes, stirring occasionally. I then ended up shutting off the heat and covering the pot entirely for the lentils to steam and absorb the hot liquid. They'll finish cooking if you just leave it for another 10 minutes with the lid on and heat off.The lentils should be soft and everything kind of in a stew of deliciousness. Taste to see if it needs any salt, then add a few splashes of Tabasco to perk it up. Serve with wedges of lemon to squeeze over the top.This is great by itself but the hot pink bollywood beet sauce really takes it to another level. It makes a nice, tangy complement to the sweet and spicy stew. And it looks fabulous!

Friday, July 23, 2010

4 for 4

Everything is really expensive, have you ever noticed that? Going out for dinner is expensive, even when you're intentionally trying to be cheap and don't get drinks or whatever (which is why I'd rather just go out rarely but well, personally). Eating at home is way way less expensive, but if you like to cook, you can easily rack up some pricey ingredients. And convenience products (like my beloved corn dogs!) seem cheap but when you do the math you realize how much that one little frozen package cost compared to a full meal made from whole ingredients. And this is where 4 for 4 comes in. During dinner for the last couple of evenings, I've been amusing myself trying to figure out how much our meal for two cost. And I realized that we could often keep it to around $4 or less. Phil said we should make ourselves a challenge: to get at least 4 dinners a week to come in around $4.

Here's a couple examples. On Wednesday we got a rotisserie chicken from the DeKalb Farmer's Market, because they're free-range and delicious. If it's too hot and I can't roast one myself, I'm completely happy with one of theirs. That was $6.99, so we had half of it on Wednesday making it $3.50 for the chicken. Then we each had an ear of corn ($1 for 4 ears), for another 50 cents, plus green beans which came to about 45 cents (everything was from the DeKalb Market and all regionally grown which may help with the lower prices). So dinner for the two of us was a little less than $4.50. Last night: the rest of the chicken ($3.50); 2 ears of corn plus a green chile and some butter beans to make succotash (0.50 + 0.15 + 0.25 = 0.90); half a baguette (0.50). Total was $4.90. Huh. Could have done better, that's closer to $5!

This all sounds a little bit tedious but it's actually kind of fun. At very least it helps with perspective: you realize that you may want that frozen pizza because it seems cheap and easy (I harbor a secret love for frozen pizza, did you know that?) but it actually costs around $7 or $8...which is double what you would spend on a meal that was entirely homemade, not to mention far more healthy and well-balanced. It's interesting. Or you could buy a container of chicken stock but then you're adding almost $3 to your meal right there, where you could just have made stock more or less for free from leftover chicken bones and a few veggies(which is what I'll do with the rotisserie leftover from this week). But this isn't supposed to be about beating yourself up over a couple extra cents ("I could have saved 0.15 if only I'd left the chile out of my succotash!") or getting out the calculator instead of enjoying your dinner. It's just another way to consider consumption...and maybe save a few bucks every month. Wish us luck!

Sunday, July 18, 2010

Drunken fusilli with shrimp

Why is this pasta so drunk? It's downright shameful. You cook dried fusilli in a mixture of white wine and chicken stock until it's all absorbed and the pasta is soft and creamy. Then in go some shrimp and lemons. Easy and yummy. You have to stand over it and stir occasionally, but that's why you should make sure the wine you use is one you want to drink too.I start out by peeling and deveining 1/2 pound of large-ish shrimp. Just because otherwise I'll be annoyed if I forget to do it early on and then have to hustle on it at the end. Stick them in the fridge until you're ready to add them in (which isn't until the last 3 minutes of cooking so they've got a while).Mince up about 1/2 of a large onion and saute in a healthy mix of 1 tablespoon butter and 1 tablespoon olive oil.Just give the onions about 4 minutes or so over medium-high heat--they don't need to get browned, just lightly softened and flavorful.Now add fusilli! This is half of one of a regular 1 lb. bag (the amounts here are just about perfect for 2 people so increase as needed by using 1 pound of shrimp, the whole bag of pasta, etc). Just add it in and stir it around in the butter-olive oil for about 1 minute or so.Now here's the drinky drunk part. The pasta will absorb a lot of liquid when dry-cooked in this manner, but the trick is not to add it all at once--much like making risotto. I mix one cup white wine with 1 cup chicken stock and add the mixed liquid in 2 cups at a time. You may end up needing to add in nearly 6 cups total. So, a cup of wine...Then plus a cup of stock...and voila. Just repeat as needed throughout the cooking process.Go ahead and pour your first two cups of the wine-chicken stock mixture over the pasta in your pan.Stir it around slowly...it won't seem like anything is really happening at first.But then as you go you'll realize those greedy fusilli are drinking in the wine and getting softer. The liquid will start to dwindle after about 5 minutes, so go ahead and add in another 2 cups of the wine-stock mix. Stir stir stir. You can see how they're absorbing it all and getting cooked through slowly. Hopefully you are also absorbing some wine as you stand there by the stove.Go ahead and taste for doneness after the second batch of liquid is almost absorbed--does it need more? It probably will, but maybe not a full 2 cups so just add a little bit in at a time. Keep on tasting the pasta at this point because you want to know when it's al dente. The whole stirring-and-absorbing process should take you about 15-20 minutes; the pasta should be soft and well-coated with a bit of creamy sauce as a residual from the absorbtion of all that booze and stock. Now, what about those peeled shrimp in the fridge?When the pasta is done to your liking, go ahead and dump in your shrimpies.Roll them around with the pasta until they turn a lovely pink, then remove the pan from heat (about 2 minutes, tops). Squeeze in the juice from a lemon and toss everything with a few slices that you've cut from the squeezed out half. Now is a good time to taste for salt--if your stock was very salty you might not need any or just a little--and add fresh pepper plus some chopped basil, if you have it handy.I served this with my absolute favorite summer vegetable broil. This one was perfect, tiny tomatoes together with okra and peppers. They turned out to be just the right partners for this tipsy pasta.

Saturday, July 10, 2010

Skillet zucchini lasagna

Get out your cast iron pan! Of course it's fine to make this simple layered dish in anything that's oven-safe, but I think it crisps up really nicely in cast iron. The sheets of pasta in this recipe are actually thin slices of zucchini! File this one away for when the harvest brings in a major zuke bonanza...this is just a small version using two little ones but I bet you could make a big one for a potluck or something that would use up a whole bunch. Slice your zucchini very thinly using a mandoline slicer (or just a steady hand and a sharp knife is fine too). If you are rich in time, you can saute the zuke slices in a little olive oil and garlic for good flavor, or just be lazy and don't bother. Like me! For the first layer, drizzle about 1 tablespoon olive oil and add several dots of butter to the bottom of a cast iron skillet, then cover with 1/2 cup of tomato sauce. I happened to have a meat sauce made already so I used that, which of course makes for a heartier dish. But if you're a veggie or just only have tomato sauce--go ahead and use it! You'll need one cup total (for 2 layers) so it's actually a great way to use up leftovers from the fridge. Lay out half your zucchini slices over the sauce... Then 1/2 cup cooked small pasta. I had orzo hanging around as leftover, so I used that. You'll need at least 1 cup total, but more is fine too. Just divide however much you have in half to use on each layer. Now dot the top of the pasta layer with chunks of fresh mozzarella and a little shredded provolone (maybe about 1/4 cup). I had one of those large balls of fresh mozzarella--this is half of that, sliced up. And parsley, minced. Add basil too if you have it. My basil plant isn't keeping up with my demand so I'm letting it chill out for now. Layer two! Another 1/2 cup of sauce... You'll need to kind of dot the sauce around, rather than spread it this time. Then the rest of your zucchini slices.And layer on the rest of your pasta, plus the remaining mozzarella slices. A little more grated provolone on top too, just for flavor. And a last sprinkle of minced parsley. Very pretty. Put it in the oven at 350 for about 40 minutes. It should be nice and gooey and the zucchini should be quite tender. At the very end of cooking, turn on the broiler for a couple minutes to get the top all browned and irresistible looking.It looks kind of like lasagna, right? Anyway, it's very very yummy.