The Fourth of July is probably my family's favorite holiday. Growing up we really threw ourselves into the fireworks, the parades, and the food--and to this day I have to make sure we celebrate the holiday properly. This year we spent the day at the pool and then had friends over to eat fried chicken and biscuits, watermelon and corn on the cob...totally
classic. It absolutely poured rain though, so the fireworks were kind of a bust. But we had this delicious pan-fried chicken to make up for it--the recipe comes from
The Gift of Southern Cooking, by Scott Peacock and Edna Lewis. Scott Peacock used to be the chef at
Watershed Restaurant here in town which is justifiably legendary for their fabulous fried chicken served every Tuesday evening. Making it at home takes a little effort and planning ahead but it's totally worth it, especially for the best holiday of the year.

Start with a 3 pound chicken (these days I only buy from
Springer Mountain Farms) cut up into 8 serving pieces. Make enough brine to cover the pieces--for this amount, 2 quarts of water mixed with 1/2 cup kosher salt will be enough.

That's why this recipe takes so long--it's all the time needed for brining. Let it sit 8-12 hours in the fridge (basically put it together before you go to bed the night before and you'll be fine). The salty brine really needs the time to get in there to make the chicken unbelievably juicy and tender.

Bright and early the next morning (or 8-12 hours before dinnertime, whichever comes first), drain the chicken from the brine...

Fail to plan ahead adequately and make a run to Kroger for buttermilk (but it's OK because that means you can get some doughnuts for breakfast!).

Pour one quart of buttermilk over the drained chicken pieces.

And let it all soak in the fridge for another 8-12 hours. Again, as with the salty brine you made earlier, the buttermilk just needs some time to get in there to tenderize and add its unmistakable flavor. You should go to the pool in the meanwhile. After enough time has elapsed, you can go ahead and drain the buttermilk off 'cause you are ready to fry!

Well, almost ready. There's a lot of preparation involved in making proper fried chicken, in case you hadn't noticed. You need to get your fat right. At Watershed they use a combo of 1 stick butter and 1 pound lard but I don't really have any lard, generally speaking. So I used 1 stick of butter together with all of my saved up bacon fat.

Melt the fat and the butter together and cook over low heat for 30 minutes, skimming off any milk fat solids from the butter that rise to the surface. When you are ready to start frying, heat it up over medium-high until it is sizzling. The original recipe calls for the frying fat to be at 350 degrees, in case you have a thermometer handy.

Mix together 1 cup flour, 2 tablespoons cornstarch, 1 teaspoon salt and freshly ground black pepper. Dredge your chicken pieces one by one in this mixture, tapping off any excess.

And set aside on a plate.

OK, you have your chicken all ready to go and your fat is all prepared--now it is time to fry. For real this time!

Fry the chicken on each side until it is a gorgeous golden-brown, 8-10 minutes per side.

You do not want to crowd the pieces in--give them lots of room and be sure to cook in batches if needed! I needed to do mine in 2 batches and I do have a very large pan, so adjust as needed for your size of kitchen equipment. I also ended up turning on two burners to keep an even heat--this will only work if you have a large pan and a stovetop that permits a pan to fit over at least 2 burners at once.

When both sides are lovely and browned, remove and drain the pieces on a wire rack over some newspaper to catch all the drips.

I thought I'd need to, but in the end didn't end up keeping it warm in the oven or anything like that between batches. It stayed crispier that way and was perfectly flavorful simply warm or at room temperature. Serve with honey and fresh biscuits. Phil makes great biscuits--he cuts in the butter by hand and uses yogurt to mix them together. I should get him to do a guest post sometime :)

Enjoy your chicken--every last piece! It makes a perfect new Fourth of July tradition.


 There's a new place in the neighborhood called Wrecking Bar Brew Pub and not only do they have the freshest, tastiest beer in town, but they also have these delicious little crackers. They're packed full of different seeds, nuts and fruit and they are great with cheese. I was slightly tipsy there one evening and was begging our server to just bring me a huge pile of them to wallow in ("All I want...are some more of these crackers. Can just get, like, a basket of these? But they're so gooooood!" And so on). She gracefully/wisely demurred and so I went home and figured out how to make them myself. This recipe is flexible--feel free to change it up with different combos of fruits and nuts! It uses a technique similar to making biscotti--first you bake the cracker batter together in a loaf, then once it is cool you slice into thin sections and bake once more until crisped.
 You need a total of 1 1/2 cups of seeds/nuts and 1 cup of dried fruit. In this batch I used a combination of hazelnuts, almonds, pecans and sunflower seeds for the nuts...
 And golden raisins and dates for the fruit. Dried cranberries would be excellent in here! Or dried apricots. So would pumpkin seeds.
 I liked the nutty, full flavor of the crackers at Wrecking Bar, so I figured I'd try to duplicate with a combination of whole grains along with regular white flour. You will need 2 cups of flour total and I think at least 1 cup should be regular white flour, to keep the loaf from being too dense. My combination was the following: 1 cup white + 1/2 cup rye flour + 1/4 cup wheat bran + 1/4 cup flax seed meal. The rye was a great touch although Phil thought it tasted a little like a bagel (not a bad thing if you like bagels). But you can do 1:1 with white and whole wheat, or even just all white if you feel like it.
 Mix the flours up very well along with 2 teaspoons baking soda and 1 teaspoon salt.
 Make a well in the center and add in 1/2 cup of sweetener. I used 1/4 cup each of brown sugar and honey.
 Measure out 2 cups of yogurt. You can also use buttermilk.
 And add it in!
 It will be a very thick batter so get ready to wrestle.
 And add in all your fruits and nuts! Mix it up as well you can but don't overbeat it.
 Actually, I don't think you can overbeat it. It's like concrete.
 Grease a couple of loaf pans well with olive oil, or a cooking spray. If you only have one loaf pan and really have no idea where the other one went go ahead and use your weird vintage Fire King dishes. At one point I kind of kitsch collected this stuff. These are the only two pieces I have left, now that the loaf pan has walked off.
 Fill 'em up. They will rise a little bit so leave some room.
 They bake in a preheated 350 degree oven for 20 minutes. After they've cooled for a few minutes in their pans, turn them out to a wire rack to finish cooling off.
 Very nicely browned.
  Put the loaves into your freezer for about 15 minutes. This will make them firm and easy to slice for the next step of cracker-making. You'll need a sharp knife! I sliced mine into very thin wafer-like slices.
  I only used the big loaf and it made an epic quantity of these crackers. I froze the two other little ones to slice up and bake at a later point.
 So many crackers...
 Lay them in a single layer on an ungreased baking sheet...
 And let them crisp up for 10 minutes in a 300 degree oven. Flip them over and let crisp on the other side for another 10 minutes.
 Some of the thinner ones may get a bit over-toasty but that's OK. Take them out and let cool.
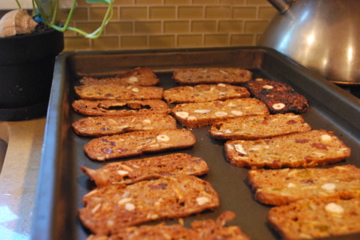 They're so flavorful! And possibly even nutritious?
 Wonderful with brie or farmer's cheese and some fresh figs. Enjoy!