This is a recipe for keeping the house cool during summertime cooking--fast cooking fresh tortellini tossed with a few rich ingredients that don't need to go on the stove. I don't want to call it a pasta salad because that sounds like a side you'd order under duress at a sandwich place ("umm, you can choose between potato chips, or coleslaw or pasta salad"). It's more like a room-temperature pasta dish, and it will gladly travel with you to potluck BBQ parties or to the office for lunch for the rest of the summer.

Fresh tortellini are best because they'll cook in 5 minutes or less and their flavor is usually better. Sicilians say the shape of a tortellina is meant to evoke the navel of Venus, but
sicilians say a lot of things. They are really pretty though.

Get 1/2 cup of frozen fresh green peas or butter beans because they'll cook up at the same rate as the tortellini.

Bring a big pot of well salted water to a boil and add the beans and tortellini on in there together. Friends taking a bath together.

It should only take 5 minutes before the pasta is ready to drain. Then you can turn off your stove and never speak of it again.

After you drain the pasta and beans, and while they're still hot, dress them with a good few tablespoons of olive oil. This will prevent stickiness and makes the pasta more flavorful.

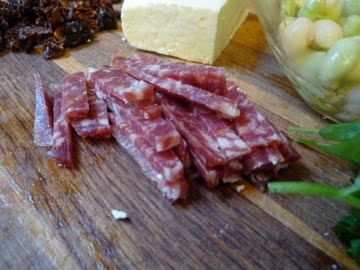
You can easily omit this part for a vegetarian version, but I like to add about 1/4 cup of salami, cut into thin matchsticks.

Components: 1/2 cup ricotta salata or queso fresco, the afore-mentioned (and omittable) 1/4 cup salami, 1/2 cup chopped sun dried tomatoes, 4 leaves basil, 1/4 cup chopped parsley, and the juice from 1 lemon.

Add the salami and the sundried tomatoes to the tortellini while still hot--the heat from the pasta is needed to best bring out the flavors for these dried ingredients.

After it cools down a little bit, add in all the rest of your ingredients, crumbling up the cheese as you go.

Toss it all together and see if it needs more salt (all this stuff is pretty salty so I think you should season to taste to make sure no one strokes out after eating dinner). Add some fresh ground black pepper right before serving.

It will probably taste even better the next day, after flavors have melded a bit. This is a great make-ahead dish or for lunch the next day...if you can keep people from eating it all right away out of the serving bowl.


 Tofu! So polarizing. I love it deeply but I recognize there's times when it needs to up the texture factor. Here's how I make it a crispy delight--particularly suitable for dipping or adding to your favorite stirfry.
 Maybe people would love it more if they realized that it's basically just cheese? Look at it! Like a giant square-shaped fresh mozzarella. Wetness is an enemy of crispy frying so the first thing to do is get the tofu as drained as you can. Cut it in half and lay it out in a paper-towel lined colander.
 Put another layer of paper towels on the top surface of the tofu slices and weigh it down with something heavy, like big tomato cans or something. I used my Alterra coffee canister that Jocelyn gave me years ago as a going away present when I left Milwaukee. It does have a pound of coffee in it so it's good and heavy right now.
 After at least 30 minutes, your tofu should be really well drained. But please note--even if you don't have time to drain the tofu or just didn't think of it or whatever, you can still squeeze the tofu and get some water out of it. It won't be totally dry but it's better than nothing. Cut the slices into cubes of whatever size you like. Smaller will be crispier. I went for medium size ones here.
 Mix up equal parts four and nutritional yeast flakes with salt and pepper in a big bowl. This is 1/4 cup each.
  After the flour and nutritional yeast is blended, add in your tofu chunks.
 Toss 'em around, get them good and covered.
 Heat up a good 1/4 cup of canola oil in a huge pan. You want to get it really good and hot. Sizzly.
 If your pan is big enough, you can do all the tofu at once. Otherwise just work in two batches. You don't want to crowd them or they'll just be soggy and greasy instead of crisp.
 If you oil is hot enough, they'll sizzle when they hit it and start turning golden brown right away. Flip them over after a few minutes--take a look at the bottom of one or two first to see if they're the right color. You can see a couple of mine got a little bit too toasty--I think I left them on for about 4 minutes before flipping over.
 Take them off and drain well on paper towels. That's the boo thing about frying--you end up using a lot of paper towels which always makes me feel wasteful.
  Check it out! Perfectly golden squares of crispy tofu. They'll be the crispiest right after they're cooked so don't let them sit around too long.
  Like I said, smaller pieces will brown up faster and be more crisp so you may want to experiment. One yummy thing to do is to use them to dip in peanut sauce, sort of like tofu satay. Or in any stir fry, which is what we did that night--in a spicy sauce with brown rice and snap peas.